It all started with a quest for the perfect, guilt-free snack. My family, a lively bunch with varying degrees of pickiness, had fallen into a bit of a potato chip rut. I wanted something crunchy, savory, and satisfying, but also something I could feel good about serving. That’s when I rediscovered the humble chickpea. I’d used them in hummus and stews, but roasting them? It sounded promising. The first batch was… okay. A bit soft, not quite the explosion of crunch I craved. But I was determined. After a few tweaks – playing with oven temperatures, drying methods, and seasoning timings – magic happened. The result was these unbelievably Crunchy Roasted Chickpeas. The moment they came out of the oven, golden brown and fragrant, I knew I’d struck gold. My kids, initially skeptical, were instantly won over by the pop and crunch. My husband declared them “better than nuts.” Now, they’re a staple in our house – for movie nights, as a topping for salads, or just a quick handful when hunger strikes. They’re endlessly customizable, incredibly easy, and proof that sometimes the simplest ingredients can create the most delightful treats. This recipe isn’t just a recipe; it’s a snacking revelation that has genuinely changed how we munch, and I’m thrilled to share it with you.
Ingredients
- 2 (15-ounce) cans chickpeas (garbanzo beans): These are the star of the show. Look for good quality canned chickpeas, or you can cook your own from dried if you prefer (see FAQ for details). Ensure they are rinsed and drained thoroughly.
- 2 tablespoons olive oil (extra virgin preferred): This helps the chickpeas crisp up beautifully and allows the seasonings to adhere. Avocado oil or another high-heat oil can also be used.
- 1 teaspoon smoked paprika: Adds a deep, smoky flavor that is incredibly addictive. Sweet paprika can be substituted if you don’t have smoked.
- 1/2 teaspoon garlic powder: For that essential savory, aromatic kick. Ensure it’s powder, not garlic salt.
- 1/2 teaspoon onion powder: Complements the garlic powder and adds another layer of savory depth.
- 1/4 – 1/2 teaspoon cayenne pepper (optional): For those who like a bit of heat. Adjust to your spice preference, or omit entirely.
- 1/2 teaspoon fine sea salt (or to taste): Crucial for bringing out all the flavors. You might want to adjust based on the saltiness of your chickpeas and personal preference.
- 1/4 teaspoon black pepper (freshly ground preferred): Adds a subtle warmth and complexity. Freshly ground makes a noticeable difference.
Instructions
- Preheat and Prepare: Preheat your oven to 400°F (200°C). Line a large, rimmed baking sheet with parchment paper for easy cleanup and to prevent sticking. This step is crucial for even roasting.
- Drain and Rinse Chickpeas: Open the cans of chickpeas and pour them into a colander. Rinse them thoroughly under cold running water until the water runs clear. This removes excess sodium and the starchy canning liquid (aquafaba), which can hinder crisping.
- Dry the Chickpeas (The MOST Important Step for Crunch!): This is non-negotiable for achieving maximum crunchiness.
- Spread the rinsed chickpeas on a clean kitchen towel or a few layers of paper towels.
- Gently pat them dry with another towel or more paper towels.
- For extra crispy results, let them air dry on the towel for 20-30 minutes. Some people even remove the loose skins that come off during drying, believing it helps with crispiness, though this is optional and time-consuming. The drier they are, the crispier they will become.
- Season the Chickpeas:
- Transfer the thoroughly dried chickpeas to a medium-sized mixing bowl.
- Drizzle with the olive oil and toss gently to coat every chickpea evenly.
- In a small separate bowl, whisk together the smoked paprika, garlic powder, onion powder, cayenne pepper (if using), salt, and black pepper. This ensures the spices are evenly distributed before adding them to the chickpeas.
- Sprinkle the spice mixture over the oiled chickpeas. Toss again, very gently but thoroughly, until all the chickpeas are well-coated with the spices.
- Arrange on Baking Sheet: Spread the seasoned chickpeas in a single layer on the prepared baking sheet. It’s important not to overcrowd the pan. If they are too close together, they will steam rather than roast and won’t get as crunchy. Use two baking sheets if necessary.
- Roast to Perfection:
- Place the baking sheet in the preheated oven.
- Roast for 20-30 minutes. The exact time will depend on your oven and how dry the chickpeas were initially.
- After the first 15 minutes, gently shake the pan or use a spatula to toss the chickpeas around. This helps them cook evenly and get crispy on all sides.
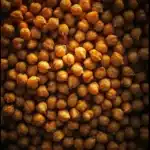
- Continue roasting, checking every 5 minutes. They are done when they are golden brown, slightly shrunken, and feel dry and crispy to the touch. If you taste one (carefully, it will be hot!), it should have a satisfying crunch. Some may “pop” open slightly, which is perfectly fine and adds to the texture.
- Cool for Extra Crunch: Once roasted, remove the baking sheet from the oven. Let the chickpeas cool on the baking sheet for at least 10-15 minutes. They will continue to crisp up significantly as they cool. This is another key step for achieving that ultimate crunch factor.
- Taste and Adjust (Optional): Once cooled slightly, taste a chickpea. If needed, you can sprinkle with a tiny bit more salt or your favorite spice while they are still warm.
- Serve and Enjoy: Serve immediately for the best texture, or store as directed in the tips below.
Nutrition Facts
- Servings: This recipe makes approximately 4 servings.
- Calories per serving: Approximately 180-220 calories (this can vary based on exact chickpea brand and oil amount).
- Key Nutrition Highlights (per serving, approximate):
- Protein (6-8g): Chickpeas are a good source of plant-based protein, essential for muscle repair, satiety, and overall bodily functions.
- Fiber (6-8g): High in dietary fiber, which aids digestion, helps regulate blood sugar levels, and promotes a feeling of fullness, making these a very satisfying snack.
- Iron (10-15% DV): Provides a decent amount of iron, important for oxygen transport in the blood and preventing fatigue.
- Folate (15-20% DV): A B-vitamin crucial for cell growth and metabolism, particularly important during pregnancy.
- Manganese (30-40% DV): An essential trace mineral involved in bone formation, metabolism, and antioxidant defense.
Preparation Time
- Prep Time: Approximately 10-15 minutes (this includes rinsing, drying, and seasoning). If you opt for the additional air-drying time for extra crispiness, add another 20-30 minutes (passive time).
- Cook Time: 20-30 minutes.
- Total Time (active): Approximately 30-45 minutes.
- Total Time (including optional air-drying): Approximately 50-75 minutes.
This recipe for crunchy roasted chickpeas is relatively quick to prepare, with most of the effort concentrated in the initial drying and seasoning. The roasting time is hands-off, allowing you to focus on other things while your delicious, healthy snack crisps up in the oven.
How to Serve
Crunchy roasted chickpeas are incredibly versatile! Here are some fantastic ways to enjoy them:
- As a Standalone Snack:
- This is the most obvious and perhaps the best way! Serve them in a bowl for a healthy alternative to chips or nuts during movie nights, game days, or as an afternoon pick-me-up.
- Pack them in small containers for on-the-go snacking – perfect for lunchboxes, hiking trips, or keeping in your desk drawer at work.
- Salad Topper:
- Sprinkle generously over any salad for added crunch, protein, and flavor. They are particularly good on:
- Caesar salads (as a healthier crouton alternative)
- Mediterranean salads with feta, olives, and cucumber
- Grain bowls or hearty green salads
- Sprinkle generously over any salad for added crunch, protein, and flavor. They are particularly good on:
- Soup Garnish:
- Use them instead of traditional croutons to garnish creamy soups like:
- Tomato soup
- Butternut squash soup
- Creamy vegetable soups
- They add a wonderful textural contrast and a boost of flavor.
- Use them instead of traditional croutons to garnish creamy soups like:
- In Wraps and Pitas:
- Add a handful to your favorite wraps or stuff them into pita pockets along with hummus, veggies, and feta for a satisfying and crunchy lunch.
- On Avocado Toast:
- Elevate your avocado toast by sprinkling roasted chickpeas on top for extra texture and protein.
- Component of a Mezze Platter or Charcuterie Board:
- Include a small bowl of spicy roasted chickpeas alongside olives, cheeses, cured meats, dips, and breads for a unique and flavorful addition.
- Trail Mix Ingredient:
- Combine with nuts, seeds, and dried fruit to create your own custom, protein-packed trail mix.
- Buddha Bowls or Grain Bowls:
- Use as a protein element in Buddha bowls or grain bowls, alongside roasted vegetables, quinoa or rice, and a tasty dressing.
- With Dips:
- While they are great on their own, try dipping them into hummus, tzatziki, or a spicy yogurt dip for an extra layer of flavor.
- Sprinkled over Roasted Vegetables:
- Toss them with roasted vegetables like broccoli, cauliflower, or sweet potatoes during the last few minutes of roasting or add them after the veggies are cooked for a crunchy, protein-rich side dish.
Additional Tips
- Dryness is Paramount: We can’t stress this enough! The drier your chickpeas are before they hit the oil and spices, the crispier they will be. Don’t skimp on the patting-dry step. Consider peeling off any loose skins, as some find this improves texture, though it’s not strictly necessary if you dry them well.
- Don’t Overcrowd the Pan: Spreading the chickpeas in a single, even layer with space between them is crucial. If they’re too close, they’ll steam instead of roast, resulting in softer chickpeas. Use two baking sheets if your chickpeas don’t fit comfortably on one.
- Spice Timing for Delicate Spices: While this recipe adds spices before roasting, if you’re using very delicate dried herbs (like dried parsley or dill) or finely grated hard cheeses (like Parmesan), consider adding them in the last 5 minutes of roasting or tossing them with the chickpeas immediately after they come out of the oven. This prevents them from burning. Most ground spices, like those in this recipe, are fine to add before.
- High Heat is Your Friend (Usually): The 400°F (200°C) temperature is generally ideal for achieving a crispy exterior quickly. If you find your chickpeas are browning too fast on the outside but still soft inside, you could slightly lower the temperature to 375°F (190°C) and extend the roasting time.
- Embrace the “Pop”: Some chickpeas might split open or “pop” slightly during roasting. This is perfectly normal and actually contributes to a crispier texture as more surface area is exposed to the hot air.
- Storage for (Relative) Longevity: Crunchy roasted chickpeas are undeniably best enjoyed on the day they are made, ideally within a few hours of cooling, for maximum crunch. If you have leftovers, store them in a loosely covered container or a paper bag at room temperature for up to 2-3 days. Storing them in an airtight container can make them lose their crispness faster due to trapped moisture. You can try re-crisping them in a 300°F (150°C) oven for 5-7 minutes.
- Flavor Variations are Endless: This recipe is a fantastic base. Get creative with your seasonings!
- Italian Herb: Oregano, basil, thyme, rosemary, garlic powder.
- Curry-Spiced: Curry powder, turmeric, cumin, a pinch of ginger.
- Sweet & Spicy: Brown sugar (or maple syrup added after roasting), chili powder, cinnamon, cumin.
- Ranch-Inspired: Dried dill, garlic powder, onion powder, a pinch of dried parsley.
- Everything Bagel: Everything bagel seasoning (add after roasting or in the last few minutes).
- Lime & Chili: Chili powder, cumin, and a squeeze of fresh lime juice after roasting.
- Using Dried Chickpeas: If you prefer to use dried chickpeas, soak 1 cup of dried chickpeas overnight in plenty of water. The next day, drain them, rinse, and cook them in fresh water until tender but not mushy (about 1-1.5 hours on the stovetop, or much quicker in a pressure cooker). One cup of dried chickpeas yields about 3 cups cooked, which is roughly equivalent to two 15-ounce cans. Then, proceed with the recipe from the drying step. Cooked-from-scratch chickpeas often have a superior texture.
FAQ Section
Q1: Why are my roasted chickpeas not crunchy?
A1: This is the most common issue! There are several culprits:
* Not dried enough: The chickpeas were still damp when you seasoned and roasted them. Moisture is the enemy of crunch. Pat them very thoroughly dry with towels and consider air-drying them.
* Overcrowded pan: If the chickpeas are too close together on the baking sheet, they will steam instead of roast. Ensure they are in a single layer with space around them.
* Oven temperature too low: A sufficiently high temperature (like 400°F/200°C) is needed to drive off moisture quickly and crisp up the exterior.
* Not roasted long enough: They might look done, but they need adequate time to dry out completely.
* Stored improperly: Storing them in an airtight container while still warm or in a humid environment will make them soft. They are best fresh or stored loosely covered.
Q2: Can I use dried chickpeas instead of canned?
A2: Absolutely! In fact, some people prefer the texture of chickpeas cooked from scratch. You’ll need to soak about 1 cup of dried chickpeas overnight (or use a quick soak method). Then, cook them until tender but not falling apart (about 1 to 1.5 hours on the stove, or faster in a pressure cooker). Once cooked, drain them well and proceed with the recipe from the drying step. One cup of dried chickpeas will yield approximately 3 cups of cooked chickpeas, which is close to the amount in two 15-ounce cans.
Q3: How long do crunchy roasted chickpeas last?
A3: For the absolute best crunch, they are best eaten the day they are made, ideally within a few hours of cooling. However, you can store them at room temperature in a container that is not airtight (e.g., a jar with the lid slightly ajar, a paper bag, or a bowl loosely covered with a paper towel) for 2-3 days. An airtight container will trap moisture and make them soft. If they lose some crispness, you can often revive them in a 300°F (150°C) oven for 5-7 minutes.
Q4: Can I make these in an air fryer?
A4: Yes, an air fryer is fantastic for making crunchy roasted chickpeas! The process is similar:
1. Prepare chickpeas as directed (rinse, dry thoroughly, toss with oil and spices).
2. Preheat your air fryer to around 380-390°F (190-200°C).
3. Place the chickpeas in the air fryer basket in a single layer (you may need to do this in batches).
4. Air fry for 12-18 minutes, shaking the basket every 5 minutes, until golden and crispy.
5. Let them cool slightly before enjoying, as they’ll crisp up more upon cooling.
Q5: What are the best spices to use for roasted chickpeas?
A5: This is highly subjective and depends on your taste! The recipe provided uses a classic smoky and savory blend (smoked paprika, garlic powder, onion powder, cayenne). Other popular options include:
* Simple Salt & Pepper: Sometimes less is more.
* Cumin & Coriander: For a Middle Eastern flair.
* Chili Powder & Lime Zest: (Add zest after roasting) for a zesty kick.
* Italian Herbs: Oregano, basil, thyme.
* Curry Powder: For an Indian-inspired taste.
* Cinnamon & Sugar: For a sweet and crunchy treat (add sugar towards the end or after roasting to prevent burning).
Experiment to find your favorites!
Q6: Are roasted chickpeas healthy?
A6: Yes, generally, roasted chickpeas are a very healthy snack. Chickpeas themselves are packed with plant-based protein, dietary fiber, vitamins (like folate), and minerals (like iron and manganese). Roasting them, especially with a moderate amount of healthy oil like olive oil, is a much healthier alternative to deep-fried snacks or processed chips. The fiber and protein content make them very satisfying and can help with weight management by promoting fullness. Just be mindful of the amount of salt and oil you use if you have specific dietary restrictions.
Q7: Can I make roasted chickpeas without oil?
A7: You can, but they won’t be quite as crispy, and the spices might not adhere as well. The oil helps conduct heat and facilitates the crisping process. If you choose to go oil-free, make sure the chickpeas are exceptionally dry. You might try spritzing them very lightly with water or aquafaba (the liquid from the chickpea can) to help the spices stick before roasting. They will still be tasty and a healthy option, but expect a slightly drier, less “fried-crisp” texture. An air fryer might yield better results for oil-free versions.
Q8: Some of my chickpeas are bursting or exploding in the oven. Is this normal? What can I do?
A8: A little bit of “popping” or splitting open is normal and often desirable as it increases crispiness by exposing more surface area. However, if they are aggressively bursting or “exploding,” it could be due to a few reasons:
* Too much moisture trapped inside: Ensure they are thoroughly dried externally.
* Very high internal steam pressure: This can happen, especially if oven temperature is extremely high from the start.
* Older chickpeas: Sometimes, older dried chickpeas (if you cooked them from scratch) can be more prone to this.
If it’s a problem, you can try slightly lowering the oven temperature (e.g., to 375°F/190°C) and extending the cooking time. Also, ensuring they are in a single layer and not overcrowded helps manage this. Generally, minor popping isn’t a cause for concern.
Crunchy Roasted Chickpeas
- Total Time: 45 minutes
Ingredients
- 2 (15-ounce) cans chickpeas (garbanzo beans): These are the star of the show. Look for good quality canned chickpeas, or you can cook your own from dried if you prefer (see FAQ for details). Ensure they are rinsed and drained thoroughly.
- 2 tablespoons olive oil (extra virgin preferred): This helps the chickpeas crisp up beautifully and allows the seasonings to adhere. Avocado oil or another high-heat oil can also be used.
- 1 teaspoon smoked paprika: Adds a deep, smoky flavor that is incredibly addictive. Sweet paprika can be substituted if you don’t have smoked.
- 1/2 teaspoon garlic powder: For that essential savory, aromatic kick. Ensure it’s powder, not garlic salt.
- 1/2 teaspoon onion powder: Complements the garlic powder and adds another layer of savory depth.
- 1/4 – 1/2 teaspoon cayenne pepper (optional): For those who like a bit of heat. Adjust to your spice preference, or omit entirely.
- 1/2 teaspoon fine sea salt (or to taste): Crucial for bringing out all the flavors. You might want to adjust based on the saltiness of your chickpeas and personal preference.
- 1/4 teaspoon black pepper (freshly ground preferred): Adds a subtle warmth and complexity. Freshly ground makes a noticeable difference.
Instructions
- Preheat and Prepare: Preheat your oven to 400°F (200°C). Line a large, rimmed baking sheet with parchment paper for easy cleanup and to prevent sticking. This step is crucial for even roasting.
- Drain and Rinse Chickpeas: Open the cans of chickpeas and pour them into a colander. Rinse them thoroughly under cold running water until the water runs clear. This removes excess sodium and the starchy canning liquid (aquafaba), which can hinder crisping.
- Dry the Chickpeas (The MOST Important Step for Crunch!): This is non-negotiable for achieving maximum crunchiness.
- Spread the rinsed chickpeas on a clean kitchen towel or a few layers of paper towels.
- Gently pat them dry with another towel or more paper towels.
- For extra crispy results, let them air dry on the towel for 20-30 minutes. Some people even remove the loose skins that come off during drying, believing it helps with crispiness, though this is optional and time-consuming. The drier they are, the crispier they will become.
- Season the Chickpeas:
- Transfer the thoroughly dried chickpeas to a medium-sized mixing bowl.
- Drizzle with the olive oil and toss gently to coat every chickpea evenly.
- In a small separate bowl, whisk together the smoked paprika, garlic powder, onion powder, cayenne pepper (if using), salt, and black pepper. This ensures the spices are evenly distributed before adding them to the chickpeas.
- Sprinkle the spice mixture over the oiled chickpeas. Toss again, very gently but thoroughly, until all the chickpeas are well-coated with the spices.
- Arrange on Baking Sheet: Spread the seasoned chickpeas in a single layer on the prepared baking sheet. It’s important not to overcrowd the pan. If they are too close together, they will steam rather than roast and won’t get as crunchy. Use two baking sheets if necessary.
- Roast to Perfection:
- Place the baking sheet in the preheated oven.
- Roast for 20-30 minutes. The exact time will depend on your oven and how dry the chickpeas were initially.
- After the first 15 minutes, gently shake the pan or use a spatula to toss the chickpeas around. This helps them cook evenly and get crispy on all sides.
- Continue roasting, checking every 5 minutes. They are done when they are golden brown, slightly shrunken, and feel dry and crispy to the touch. If you taste one (carefully, it will be hot!), it should have a satisfying crunch. Some may “pop” open slightly, which is perfectly fine and adds to the texture.
- Cool for Extra Crunch: Once roasted, remove the baking sheet from the oven. Let the chickpeas cool on the baking sheet for at least 10-15 minutes. They will continue to crisp up significantly as they cool. This is another key step for achieving that ultimate crunch factor.
- Taste and Adjust (Optional): Once cooled slightly, taste a chickpea. If needed, you can sprinkle with a tiny bit more salt or your favorite spice while they are still warm.
- Serve and Enjoy: Serve immediately for the best texture, or store as directed in the tips below.
- Prep Time: 15 minutes
- Cook Time: 30 minutes
Nutrition
- Serving Size: one normal portion
- Calories: 220
- Fiber: 8g
- Protein: 8g